The Cammy ecosystem comprises of a cloud based streaming and recording service and specially modified rebranded Foscam cameras. The modification mainly includes the proprietary plug and play software, which allows for simple account association, outbound registration and direct streaming of camera feeds.
Mangocam can support these cameras, however this obviously can't take advantage of custom plug and play features. Stream access needs to be configured manually for each camera, so the configuration process is naturally more involved and may even require assistance from IT professionals in some cases.
The first step is to have a static IP address (which does not change with every router restart) for your Internet connection. You can check your public IP via whatismyip.com (My Public IPv4 is) etc. Most ISP's will assign a static IP free of charge when requested, however in some cases this is not possible. Alternately a dynamic DNS (DDNS) service like no.ip can be utilised (some cameras have dynamic DNS built in). Please see which DDNS service your router or camera supports.
The next step is configuration of port forwarding, sometimes called virtual server. There is more info here about this. Mangocam requires remote access to the RTSP port (554/tcp) of each camera. We recommend manual port forwarding rules and UPnP disabled (as UPnP can be a security issue). Also when forwarding ports manually it is recommended to fix / reserve the IP address of your cameras in your router, so these don't change over time (DHCP address reservation).
The final step is to create a direct stream camera in Mangocam (config > cameras > add direct stream) to your account, using your external IP address or DDNS name as address and the external port number (which forwards to 554/tcp on your camera) as port. Please choose the "Cammy /videoSub" camera profile for this.
IP cameras need power to function. The vast majority of units require conventional mains or PoE power.
In order to help choose whether to power or use PoE – we have listed some pros and cons for consideration.
To check to see if you have adequate WiFi coverage to run your WiFi IP cameras, all you need to do is place a smartphone in the location that you wish to place your WiFi IP camera. If you have full bars then the location is optimal and ideal for IP CCTV placement.
If your coverage is one bar less than full strength, then this should be ok as well – however please note that you will most likely not be able to stream at the full bandwidth.
If your WiFi signal is not optimal, then we suggest wiring. Cat5 cable or above is required for this.
Your CCTV camera will not record footage if your camera is not connected to the network and this could happen at a critical moment. Therefore where possible, we always recommend wiring your IP CCTV cameras, to ensure the highest level of connectivity between your camera and your Internet source.
This being said, if you have a full WiFi signal in the area that you wish to place your CCTV camera, this of course will still work and is the best non wired choice should you wish to go WiFi and not be able to wire.
The difference between a NVR and DVR can be confusing to many. The main difference is that NVRs connect to and record from IP (smart) cameras and DVRs connect and record from analogue (dumb) cameras. The main advantages of NVRs is that the IP cameras connected are capable of motion detection, sending emails and direct remote access, so the cameras can be used independently. If they are Onvif compatible, different vendor brands can be combined as required.
Mangocam can access streams via DVR's (digitized analogue images) or NVR's as well as directly to IP cameras connected to an NVR. The preferred method is to access (and port forward) each camera independently, as this will reduce load on the NVR and also eliminate the NVR as single point of failure. NVRs and IP cameras are the future, slowly replacing analogue cameras and DVRs.
Port forwarding allows remote computers (for example, computers on the Internet) to connect to a specific computer or service within a private local-area network (LAN). For Mangocam to be able to access IP cameras, NVRs and DVRs remotely (in direct stream mode), the configuration of port forwarding is essential.
Port forwarding is a function of your modem or Internet router (almost all devices on the market support this) and needs to be setup for every internal device that requires external access. If you have three cameras, you will also need to configure three port forwarding rules in order to access these over the Internet. Most private and small business Internet connections only provide one external (routable) IP address, which is fine for outgoing Internet connections like web surfing and email, but makes it harder to actually host / provide services. Port forwarding will configure your modem / router to listen on a specified external network port and forward all external traffic accessing this port to an internal IP address and port - effectively allowing your internal devices like an IP camera to be accessible remotely and allowing it to provide web or RTSP services.
A typical router requires four parameters in order to forward a single port / device:

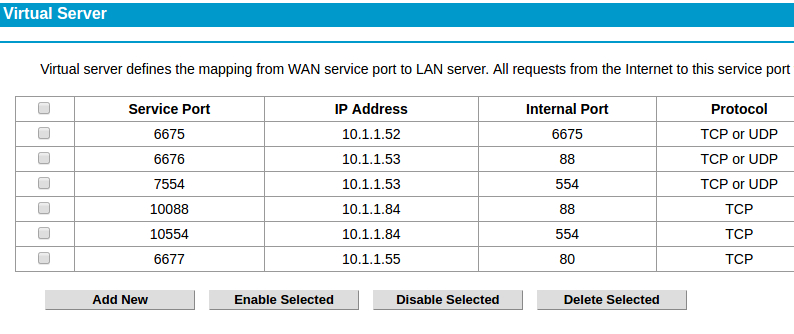
The external IP addres is not required, as there is usually only one. This screenshot shows the IP forwarding (virtual server) configuration of a TP-Link router with 6 different forwarding rules for IP cameras. Two cameras (runnig on 10.1.1.53 and 10.1.1.84) are having two ports each forwarded - for HTTP and RTSP stream access.
If the router asks for start and end ports (some require a range to be entered), please use the same port number for both (only one port needs to be forwarded per camera).
Detailed and free instructions for port forwarding on almost any router can be found on portforward.com. We are also recommending the use of whatsmyip.org to find your external IP address as well as canyouseeme.org to check / verify if your port is open / available. Furthermore there are many videos regarding port forwarding configuration on youtube.com.
For multiple cameras, please map each camera's RTSP port (554/tcp+udp for example) to a high external port number (ideally a random port between 10000 and 60000). camera1 internal 554 -> external 11554 camera2 internal 554 -> external 12554 camera3 internal 554 -> external 13554 camera4 internal 554 -> external 14554 If your modem / router does not support a different external from internal port, then please change your camera's RTSP port to 11554, 12554 etc. and map the port as is. Please also be aware that some routers won't let you access the externally forwarded port from your internal network.
Foscam HD cameras such as the Foscam FI9* series, FosBaby, C1, C2 and R2 offer jpeg, motion jpeg and RTSP / H.264 video streams. We are concentrating on H.264/RTSP here, as this provides the best frame rate and quality combined with much lower bandwidth than jpeg compression based streams due to inter frame compression. All Foscam HD cameras offer two separate H.264 stream profiles, the sub stream (geared towards lower quality Internet streaming) and the main stream (for local / LAN viewing and recording).

Most models are using the HTTP port (88/tcp by default) for RTSP traffic as well - they don't show a dedicated RTSP port number selector on the Settings > Network > Port configuration (or Settings > Network > Onvif) screen (see image). For these cameras, please port forward port 88/tcp on your router / modem for Mangocam to access the H.264 video stream via RTSP.
However, other models (using the Ambarella chipset) are using port 554/tcp (the default RTSP port) for RTSP/H.264 video - and port 88/tcp for web / HTTP traffic only. For these models, port 554/tcp (or whichever port is configured as RTSP port on this configuration screen) is required to be forwarded to access the streams.

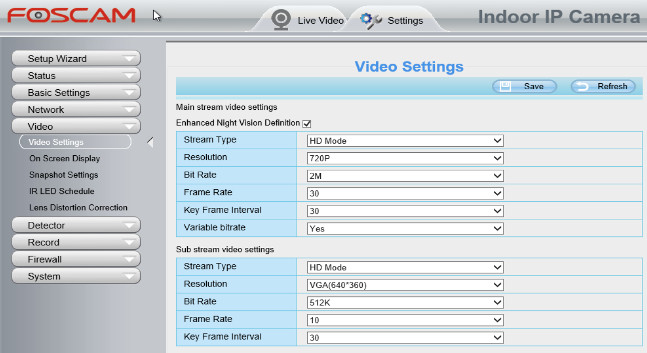
All Foscam HD cameras feature two streams, which are labeled sub and main stream. These can be configured separately in regards to resolution, frame rate, bandwidth etc. By default, the main stream may be configured to exceed 4 Mbps bandwidth and is not recommended for remote (Internet) access as is.
Please keep in mind that this is upload bandwidth, which may exceed the maximum data upload speed of your Internet connection. In most cases this can be lowered to less than 1 Mbps without significant loss in image quality. Please find our recommended stream configuration settings here.
The main stream (higher bandwidth) is normally used for viewing in the web browser and for NVR's. Assuming the image quality and resolution of the sub stream is sufficient (some Foscam models may only allow 320x240 pixels here, even though the main stream allow 720, 960 or 1080p), we are recommending to use sub stream profiles (labeled as sub) for Mangocam.